

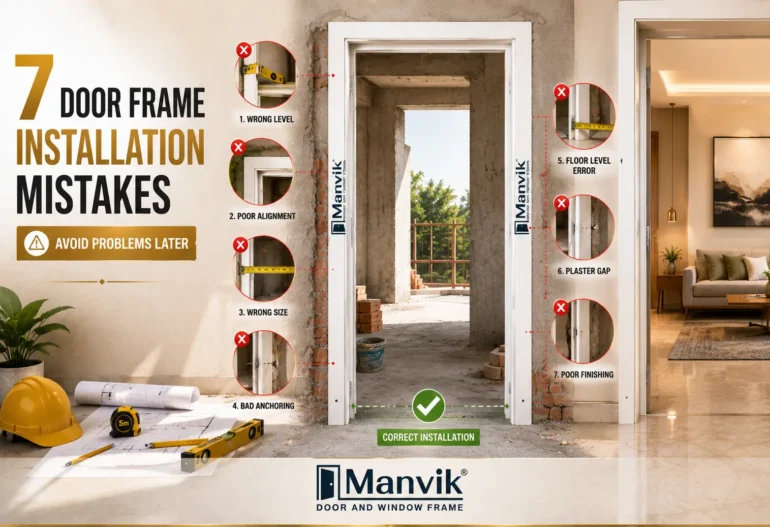
A door frame that appears perfect on the day of installation may start to cause problems a couple of months later. The door starts to scratch the flooring; there’s a gap opening upwards on one side and the other is still snug, the lock stops from securing itself to the strike plate, or the frame is a little loose when you put your finger on it. For almost all cases such a situation, the primary reason is not the doorIt’s a thing that occurred during the frame’s assembly.
Most door frame installation mistakes don’t show up immediately. They can surface months or weeks later, once flooring has been put in place and plastering has been completed and the property has come into routine. Then, fixing the issue usually involves cutting through a floor or wall. This can be less disruptive than discovering the issue in its construction.
This article outlines the top seven problems with installing door frames and the reasons they occur and what they can cause later on as well as how the homeowner, builder, or contractors can avoid the same mistakes, whether using traditional wooden frames or a more modern PPGI door frame.
What Are the Most Common Door Frame Installation Mistakes?
The most frequent door frame problems with installation include inaccurate measurements, disregarding wall thickness or the finished wall level, setting the frame without the plumb or level, ineffective fix, not noticing the final floor’s level, and not coordinating when plastering and skipping one final inspection prior to the flooring and wall work being finished.
The seven blunders covered in this document:
- Untrue measurements
- Not paying attention to the wall thickness or finishing wall levels
- The frame is then erected using the plumb or level
- A poor fix, and not enough support
- Inattention to flooring and floor
- Lack of coordination when placing plaster
- Inadequately checking the frame prior to finishing
Any of these problems may cause a unique kind of issue based on the door’s design as well as the frame’s material as well as the system of fixing employed. Frames made of wood, PPGI door frames, as well as frames designed for an opening for a false ceiling will differ in their response to the same error in installation; however, the root cause is generally identical across all types of frames. & japani chaukhat
7 Door Frame Installation Mistakes That Can Cause Problems Later
1. Taking Incorrect Door Opening Measurements
Measurement is at the beginning of any door frame installation This is also the point where the biggest errors begin. Frames are only as good as the space they’re designed to accommodate, and the opening itself can only be as great as the number of numbers employed to determine its size.
Prior to a frame being set or fixed, a variety of dimensions must be checked as a whole, not separately:
- Opening wide (measured at multiple heights, as masonry openings not always homogeneous)
- Height of opening (measured at the level of the floor that is finished but not at the present subfloor level or base level.
- Wall Thickness (including the final application of the plaster to be applied to both sides)
- Dimensions of the frame are the width, height, and depth of the frame’s own profile
- Dimensions of the door shutter The actual dimension of the leaf on the door, as well as the space it requires to be able to freely swing
- Floor level that is finished where the floor will rest after flooring has been laid, not at the same level as on the day of installation.
- Level of wall finished—The wall’s surface following the plastering or finishing process, but not the brick face or block faces
An error that is common is taking measurements of the opening of the masonry and then ordering a frame that will precisely match the opening but not considering the plaster layer, which will be added later, or flooring that elevates the floor. Another common mistake is to measure only at one spot and make the assumption that the opening is even across the entire length.
A measurement that is incorrect can cause the following:
- An opening with a tight fit that pushes the frame into place through pressure that is too high, which could cause distortion to the frame
- Large gaps, which later require being filled with or packed and weakened the fix
- The installation is difficult and slow when the installer attempts to make up for the loss on site
- Doors alignment issues after the shutter has been hung
- Rework, which may include taking and reinstalling the frame
Practical Measurement Checklist:
- Measure width at the top, middle, and bottom of the opening
- Measure height at both jambs, not just one side
- Confirm wall thickness including planned plaster thickness
- Confirm finished floor level with the flooring contractor before finalizing frame height
- Cross-check frame dimensions against the actual door shutter size
- Record measurements in writing before placing an order for custom-size frames
2. Ignoring Wall Thickness and Finished Wall Level
The frame of a door isn’t a part of an opening; it’s a part of two walls that are eventually finished with paint, plaster, or some other finish. If the builder doesn’t take into account the final wall’s height, the door frame could be placed in the wrong spot relative to the wall’s area.
The most common error is taking the brick’s or block thickness as the ultimate measurement without incorporating the thickness of plaster that is to be sprayed on both sides. Because the thickness of plaster varies from the project as well as by the contractor, the depth of the wall must be determined—or the position of the frame modified—keeping the wall’s final thickness in mind, not only the one currently.
What happens if it is not taken into consideration:
- The frame extends too far over the wall’s finished surface, creating an inconvenient move
- The frame is too deep; it is receding below the wall
- Inequal finishing in the areas where the the frame edges unevenly across the two faces
- It is difficult to fit an architrave, trim or a frame to be firmly anchored against the wall
- An unprofessional or noticeable style of appearance surrounding the opening even though the door functions properly
The coordination of frame depth and location with the plastering plans ahead of the frame’s being put in place — will avoid the bulk problems in this area totally.
3. Installing the Frame Out of Plumb or Level
It’s one of the most frequently made and costly door frame errors, since doors that aren’t straight, square, and level are almost guaranteed to fail no matter how great the hardware or door shutter is.
It’s helpful to be clear regarding the meaning of these terms:
- Plumb refers to the vertical orientation of frame jambs—the degree to which they’re in a straight line and without leaning either forward or backward or to the side.
- Level is the horizontal position of the head of the frame (top member) and whether or not it’s flat and level rather than being tilted.
- Square is a reference to the corners of the frame—whether or not the jambs touch the head in true 90-degree angles.
- Alignment is a way to tie all these together. A frame that’s flat, plumb, and level at its most fixed point.
What happens when the alignment is wrong? difficulties:
- The door smacks into the frame from one end and leaves a gap to the opposite side.
- The door isn’t closing correctly or requires the force of a latch to close.
- The door’s openings are irregular from the top to the bottom
- The strike plate and lock do not align, which causes the latch to become entangled or not engage
- The whole installation is clearly unbalanced at a distance.
Installers must check the plumb, level, and square on multiple occasions and not only once prior to the frame being set permanently. Frames can appear to be plumb from the bottom but appear out of alignment on the top, particularly with larger openings. A spirit level, along with a framing square on both jambs, as well as rechecking when each fixing spot is adjusted, will catch most mistakes in alignment before they turn permanent. door window frame
4. Using Incorrect Fixing or Insufficient Support
A frame that’s properly measured and positioned will still fall apart in the event that it’s not fixed correctly to the wall. The fix method must coincide with both the frame that is being utilized and the kind of wall it’s being built into. A fixation method that is suitable for the construction of a brick wall isn’t always the best choice for a block wall, a partition wall, or even a metal stucco wall.
Important factors to be sure to confirm prior to fixing:
- Correct fixing points that are compatible with the frame’s style and design, as well as the fix method recommended by the manufacturer
- Stability of the frame—checking to ensure that the frame isn’t stretched or shift as pressure is applied to the stage of fixing
- Wall Condition is a way of ensuring that the wall material is able to support the fixations to be used
- Alignment when fixing—checking the plumb line and level each time a fixing is tightened because fixing could pull the previously aligned frame off its original position.
- Instructions from the manufacturer that follow particular fixing guidelines for the frame system, as the requirements for fixing can differ between frames, frame materials, and profiles.
There’s no fixation point that is universally applicable for every frame that is based on the height of the frame and the system used to construct it along with the wall’s type as well as the specifications of the frame manufacturer; therefore, it’s crucial to follow instructions by the frame you want to be placed in the place, rather than adopting that there is a standard norm.
Implications of a bad fix:
- The frame can move in time, particularly during regular door usage
- Frames that feel unsteady or “gives” when the door is shut or opened
- A slight misalignment occurs as the frame changes slightly as it is used.
- Problems with door operation that arise within a few weeks or even months after the installation.
- The plaster may crack or the frame’s finish as it move against it
5. Ignoring Flooring and Finished Floor Level
A common issue with door frames during the construction of a new house stems from a straightforward sequencing problem: the frame installation is in accordance with the floor but does not account for flooring to be installed afterward.
The floor’s finished level—that is, after the tiled and marble or granite, wood flooring, or another flooring is laid—is the measurement of how much space the shutter of your door will be able to have when everything is completed. If the frame’s height is determined based on the unfinished sub-floor or screed level, then the thickness of flooring above that could drastically alter the size of the final distance underneath the door.
Issues that this creates:
- The door scrapes the floor after the flooring has been installed due to the space of the old floor now being reduced.
- The door may have a gap too wide under the door when the floor is a bit thinner than what would be expected or the frame was placed way too high for the floor to compensate
- The frame’s width isn’t consistent with the floor’s actual level between adjoining rooms, in particular in areas where flooring materials are different between rooms.
- The flooring is awkward when it exceeds the frame’s threshold
- Rework the frame, which may include cutting the shutters of doors or, in certain cases altering the frame
In collaboration with the flooring company prior to when the frame’s height is completed—and confirming the flooring’s material, its thickness, and the degree it will produce will avoid the majority of the problems that arise from this type. For more in-depth information on the sequence of frame installation in relation to flooring, check out our related article, Door Frame Before or After Flooring.
6. Poor Coordination With Plastering
As with flooring, it has a direct, frequently overlooked impact on how the door frame will look. The thickness of the plaster can affect the finished wall’s level for both sides. And when the position of the frame doesn’t take this into account prior to the installation, it will be apparent immediately after the plastering process is completed.
The most important factors to consider when coordinating:
- The thickness of plaster is planned for both sides of the wall
- Wall level that is finished The plaster will form when the plaster has been cured
- Frame’s location in relation to the wall opening determined with the final line in the back of your mind
- The wall opening dimensions. They must be confirmed prior to beginning the process of plastering
- Framework protection when plastering, as wet and sloppy debris from construction can harm or stain the frame if not properly secured
Issues that result from insufficient coordination
- A wall that is uneven in its finish because the plaster does not meet the frame’s edge in a clean manner
- The frame is clearly visible beyond the final plaster surface
- The frame was recessed when the the thickness of the plaster was underestimated
- Cracks in the plaster around the frame edges, especially when the frame wasn’t properly secured or supported during the plastering
- Lackluster overall finish, which requires repair or replacement of portions of the plaster close to the entrance.
To learn more about the proper sequence of these two tasks correctly, check out our guide, Door Frame Before or After Plastering.
7. Not Checking the Frame Before Final Finishing
The seventh and most often preventable error is failing to check the frame prior to when the building goes onto the next phase, such as flooring or painting or fitting hardware. When these phases are finished, the process of fixing an issue with the frame is significantly more difficult and costly than discovering the problem sooner.
Before you move to the last finishing check:
- Plumb
- Level
- Square
- Size of the opening
- Frame’s location relative to wall
- Restoring stability
- Door clearance is at the ground and on the jambs at both ends.
- Flooring level compatibility
- Wall end to ensure alignment
- Alignment of the hardware (hinge places as well as lock and strike plate places)
Rectifying a misalignment repair issue or measurement mistake at this point will generally be much easier and significantly less costly in comparison to identifying an issue later on once the walls are covered in plaster, painted, and then the floor has been laid. It is a quick inspection during this stage, which is best performed by both the contractor along with the site’s supervisor or the homeowner, and it is one of the best techniques to avoid issues with door frames when building new houses. door or window frame
What Are the Signs of Improper Door Installation?
Incorrect door fitting is usually evident in the way that the door moves and fits, not in the appearance. The most common indicators are doors that don’t shut easily, visible rubs against the floor or frame or uneven gaps on the edges of the door, and a latch or lock that isn’t aligned against strike plates.
Other indicators to look out for could include:
- The door smacks against the frame, or scratches the floor while it is opened or closed
- Door gaps are noticeable to be larger, on one hand, than on the other.
- The latch or lock won’t coincide with the strike plate, which requires force to get it engaged.
- Hinges are displaying signs of tension, or the screws are being loosened
- The frame appears to be bent or leaning when seen from several steps back
- The door can swing open or closes by itself when it’s left unlatched. It’s a sign that the frame is not level.
- The frame can move or bend when it is pushed
- There are visible gaps between the frame and the wall
- Fragments that are cracked or damaged, forming on the frame’s edge
If you notice more than one of these indications is visible, or the shutter is visible moving under normal conditions, it’s recommended to have the frame inspected by an experienced professional or installer rather than trying to make multiple adjustments to the shutter by itself, because most of the time, the issue lies related to the frame, not the door itself.
What Are the Common Problems With Door Frames?
Most common door frame issues can be classified into two types: issues caused by the installation and issues that are related to the product or material itself. Knowing which of the two categories a particular issue falls into makes it more straightforward to pinpoint the correct solution.
Problems with installation usually comprise:
- Incorrect alignment (frame is not level, plumb or square)
- A loose frame due to inadequate fixing
- The incorrect opening dimensions in relation to the frame’s size
- Inconsistent gaps in the doors
- The frame is not finished properly where it faces the wall
- Problems with door clearance in the ground
- Hardware alignment issues (hinges and locks and strike plates)
- Interface problems between walls and frames like visible cracks or gaps
Product-related or material problems may include problems such as:
- Surface imperfections in the finish of the frame
- The frame material may exhibit warping or dimension inconsistency.
- Deterioration due to moisture, if it is applicable to the particular material
- Manufacturing tolerances within the frame profile
In all construction and residential environments, the vast majority of complaints about door frames that occur after construction are related to the methods of installation—measuring of alignment and fixation, as well as coordination between flooring or plastering and not the actual frame material. That’s one of the many reasons that a well-engineered framework that is dimensionally dependable and a proper method of installation are crucial in the long run for quality.
What Are Common Door Installation Problems?
The most common problems with door installation are doors that are stuck in the frame, gaps that are uneven between the doors, and the door not being able to shut or latch correctly; the lock is not aligned properly as well as hinge-related problems, the door scratching on the floor frames, movement of the frame, and a general lack of alignment between the frame and door.
There is a good chance that a lot of problems are usually blamed on the shutters, but it’s actually the frame’s installation beneath. If a perfectly-fitting door is placed within a frame that’s not straight, level or fixed properly, it will display the same signs as the doors of poor quality that is stuck, has uneven gaps, and trouble closing due to the fact that the door’s shape is conforming to the form of the frame that it’s hanging in. The reason for this is that diagnosing problems with the door should start by looking at the frame prior to deciding if the door is actually the cause.
How to Check Whether a Door Frame Is Installed Correctly
Utilize this inspection procedure step-by-step for confirming a door frame’s installation, regardless of when you’re evaluating your own installation as an installer or examining a finished project as a homeowner or site manager.
- Examine the plumb—Place an octive level to check the jambs from top to bottom on both sides.
- Check the level Check to ensure that the frame’s head is straight and not tilted.
- Verify squareness Take a measurement of each diagonal of the frame’s opening. They must be the same.
- Verify the opening dimension—Confirm that the frame’s dimensions are in accordance with the desired size and width.
- Verify frame stability—Gently push onto the frame at a variety of places to determine if there is movement.
- Examine the alignment of walls—Verify that the frame’s position is correct relative to the wall’s surface across both ends.
- Verify the finished floor’s level Check that the clearance measured is by the finished floor and not against the subfloor.
- Verify door clearance Check for consistent clearance between the jambs and the head as well as the floor.
- Make sure the hardware is aligned. Check that the positions of the hinge and lock align correctly to the shutter of your door.
- Verify the final appearance Take a step back and check the frame visually to ensure it is straight, level, and properly completed.
Door Frame Installation Checklist for New Houses
The checklist can be printed, saved, and then used in building a new house.
- Opening dimensions confirmed
- Wall thickness confirmed
- Plaster thickness confirmed
- Finished wall level confirmed
- Finished floor level confirmed
- Frame size confirmed
- Fixing system confirmed
- Frame plumb checked
- Frame level checked
- Frame square checked
- Frame securely fixed
- Flooring coordinated
- Plastering coordinated
- Door clearance checked
- Final inspection completed
How Flooring and Plastering Can Affect Door Frame Installation
The plastering and flooring trades are the two trades most likely affected by the frame of a door after the frame has been in place, as they both add depth and can alter the levels of the frame, which weren’t there when the frame was put in.
Flooring thickness as well as the final floor levels define the exact distance under the door when construction is completed. In the case the frame is put in place and positioned to rest well above a concrete floor, but the flooring company later puts the thickest stone or tile layer, then the area underneath the door could decrease significantly—often enough to result in scraping. If, on the other hand, the frame’s width anticipates the installation of a more substantial flooring material as opposed to what’s actually put in, it could result in an uncharacteristically large gap beneath the door.
Plaster thickness as well as the final wall height are the same when facing vertically. Frames that are positioned on the block or brick wall but do not allow for an equal amount of plaster to both sides may be projected over the wall that has been finished or be recessed under the wall after plastering has been completed.
It is a good idea to remember that the installation of the door frame should not be planned separately. The best results are in the event that the frame builder and the flooring installer and the contractor for plastering coordinate on the finished levels, even without formality—before the frame is set in its place. Since the levels of finished construction vary based on construction and materials as well as the conditions of the location There isn’t a single standard that is universally applicable, and verifying the intended levels for every job is the most reliable method. Japani chokhat door frame
PPGI Door Frames and Proper Installation Planning
“PPGI” stands for pre-painted galvanized iron—an iron sheet that is factory finished that blends a galvanized steel base with a paint coating. PPGI doors have been the most popular choice in Indian housing construction in lieu of standard wooden frames, specifically when building new homes in which dimensional stability and manufacturing finishing are top priorities.
Manvik Door Frames creates PPGI door frames with welding-free construction as well as rivet-based join technology. It also comes with customized PPGI door frames that can be tailored to the specific requirements of a project that include frames to be used in new construction.
Since PPGI doors are made in accordance with exact factory specifications The correct layout of the installation plan is important, exactly the same as with other types of frames. The procedure for installation should be:
- The particular frame style being employed
- The fixation system that is suggested for this frame
- Drawings of the project and specific opening dimensions
- Manufacturer’s recommendations on installation specifically for the line of product
It’s important to note that requirements for installation may differ according to frame type, the fixing method used, wall construction, and the site’s conditions. There isn’t any one standard installation procedure that is the same for every frame material, frame, or even project. If specific installation issues arise on the job, following the manufacturer’s directions as well as the specifications of the architect or project plans, along with involving an experienced contractor or installer, is the best method to obtain accurate, project-specific guidelines. ppgi chaukhat
How to Prevent Door Frame Installation Mistakes
The majority of problems with door frames can be avoided with a proper order of inspections scheduled early enough on the timeframe of construction.
- Measurements to be finalized prior to ordering to confirm opening width, height, and wall thickness prior to ordering specifically for custom-sized frames.
- Check wall thickness with the intention of building plaster on both surfaces.
- Check the thickness of your plaster by contacting the contractor who will plaster before fixing the frame.
- Check the floor’s level with flooring contractors prior to deciding on the frame height.
- Work with the flooring contractor regarding timing and sequence.
- Coordinate with the contractor for plastering in terms of time and frame protection at the time of the plastering.
- The frame’s instructions of the manufacturer for installing it to install the frame’s style and design as well as the system for fixing it.
- Level and check plumb at various points prior to the frame becoming permanently fixed.
- Verify stability by checking the frame’s movement after the frame has been fixed.
- Check the frame prior to the final finishing—prior to flooring, plastering, or painting having been completed.
When Should You Call a Professional?
There are many issues with doors that require an expert’s intervention. However, certain indicators indicate that an experienced contractor or installer should have the time to look at your door rather than trying repeatedly to make DIY repairs:
- The frame appears to be in a tilt or lean.
- The door is not able to shut at all, irrespective of the adjustment
- The latch or lock consistently isn’t aligned with the strike plate.
- The frame itself is either moving or swaying around on the wall.
- The wall’s opening is found to be quite smaller than what was intended.
- The flooring work has significantly altered the space under the door.
- The plastering process has impacted frame alignment, or led to visible cracks
- The correction scope appears as if it will require the reworking of the opening in the wall
A professional’s help at this point doesn’t mean that something is seriously wrong. It’s the best way to identify if it’s the frame, the fixing, the wall, or the door itself and then fix it in the first place.
Frequently Asked Questions
Q1. What are the most common door frame installation mistakes?
A. The most common door frame installation mistakes are incorrect measurements, ignoring wall thickness and finished wall level, installing the frame out of plumb or level, poor fixing, ignoring the finished floor level, poor coordination with plastering, and skipping a final check before finishing work begins. Each of these can independently cause door alignment, closing, or clearance problems later on.
Q2. What are the common mistakes to avoid when framing a door?
A. When framing a door opening, avoid measuring only the raw masonry without accounting for plaster and flooring thickness, skipping plumb and level checks at multiple points, using fixing methods that don’t match the wall type, and moving on to plastering or flooring before verifying the frame is correctly positioned and secure.
Q3. What are signs of improper door installation?
A. Signs of improper door installation include a door that rubs, sticks, or doesn’t close smoothly, uneven gaps around the door, a lock that doesn’t align with the strike plate, a visibly tilted frame, and a frame that moves when pushed. These symptoms usually point to an issue with the frame rather than the door itself.
Q4. What are the common problems with door frames?
A. Common door frame problems include misalignment, a loose or poorly fixed frame, incorrect opening dimensions, uneven gaps, poor finishing at the wall interface, and hardware alignment issues. These are generally separate from material-related problems like surface finish defects, which relate to the product rather than installation.
Q5. What are common door installation problems?
A. Common door installation problems include the door sticking, uneven gaps, difficulty closing or latching, lock misalignment, hinge issues, and the door scraping the floor. Many of these originate from the frame installation rather than a fault in the door shutter itself.
Q6. Why is my door not closing properly after installation?
A. A door that won’t close properly is often the result of a frame that isn’t plumb, level, or square, causing the door shutter to bind against the frame at one or more points. It can also be caused by hardware misalignment or a frame that has shifted slightly after fixing.
Q7. Why is my door scraping the floor?
A. A door scraping the floor is usually caused by the frame height being set without accounting for the finished floor level, so once flooring is added, the clearance underneath the door is reduced. It can also happen if the door shutter itself was trimmed incorrectly or the frame has settled slightly over time.
Q8. How do I know if my door frame is level?
A. Place a spirit level against the head of the frame (the top horizontal member) and check that the bubble sits centered, indicating a horizontal, level position. It’s also worth checking both jambs for plumb, since a frame can be level at the top but still out of plumb along its sides.
Q9. What happens if a door frame is not installed plumb?
A. If a door frame isn’t plumb, the door will typically rub against one side of the frame while leaving a wider gap on the other, and the lock may not align correctly with the strike plate. Over time, this misalignment can also put uneven stress on the hinges.
Q10. How does incorrect door frame measurement cause problems?
A. Incorrect measurement can result in an opening that’s too tight, causing installation difficulty and frame distortion, or too loose, resulting in excessive gaps that need to be packed. Both scenarios typically lead to alignment problems once the door shutter is hung and can require costly rework.
Q11. Should door frames be installed before or after flooring?
A. This depends on the frame system, project sequencing, and site conditions, and there isn’t one universal answer that applies to every project. What matters most is that the frame height and clearance are planned around the finished floor level, whichever sequence is used. For a detailed breakdown, see our guide, Door Frame Before or After Flooring.
Q12. Should door frames be installed before or after plastering?
A. As with flooring, the right sequence depends on the frame type, wall construction, and project plan. The key requirement is that the frame position accounts for the finished wall level once plastering is complete, regardless of which sequence is followed. Our guide, Door Frame Before or After Plastering, covers this in more detail.
Q13. How can door frame installation problems be prevented?
A. Door frame installation problems can largely be prevented by confirming measurements and wall/floor finish levels before installation, checking plumb, level and square at multiple points, using the correct fixing method for the frame and wall type, coordinating with the flooring and plastering contractors, and inspecting the frame before final finishing begins.
Q14. Are PPGI door frames suitable for new house construction?
A. PPGI door frames are widely used in new house construction in India due to their factory-finished dimensional consistency and weld-free, rivet-based construction options available from manufacturers like Manvik Door Frames. As with any frame system, correct installation planning — measurements, fixing, and coordination with flooring and plastering — remains essential for good long-term performance.
Q15. When should a door frame be inspected after installation?
A. A door frame should ideally be inspected immediately after fixing and again before flooring, plastering, and painting are completed, since correcting an issue at this stage is far simpler than after finishing work is done. A final check after all finishing work, including hardware fitting, is also good practice before considering the installation complete.
Planning a New Door Frame Installation?
If you’re planning a new door frame installation — whether for a single home, a residential project, or a builder’s bulk requirement — getting the frame right from the start makes every later stage of construction easier, from plastering and flooring to final hardware fitting.
Manvik Door Frames manufactures PPGI door frames using weld-free, rivet technology construction, along with custom PPGI door frame options for new house projects, residential developments, and commercial requirements. Homeowners, builders, and contractors are welcome to reach out for product information, custom size door frame options, or quotation requests for individual or bulk requirements.
Whatever stage your project is at — planning, ordering, or on-site installation — coordinating frame selection and installation sequencing early is the simplest way to avoid the mistakes covered in this guide.
Also Read :-
best door and window frame for bedroom
door frame before or after flooring
door frame before or after plaster


